Blog, DIY Plumbing Guides
How to change Cartridge in your Single Lever Kitchen Tap
Just follow the 11 easy steps below to replace cartridge in your Single Lever Kitchen Tap:
- Step 1: Make sure to turn OFF the hot and cold water mains as otherwise water will come out of the side of your tap once you access the cartridge.
- Step 2: To remove the handle you must remove the grub screw with a suitable sized allen key. Be careful not to lose grub screw. Some Single Lever Taps have a coloured indicator on the front (blue / red) which conceals the grub screw. Remove this indicator carefully with something delicate e.g. tip of knife, being careful not to scratch your tap to access grub screw behind.
- Step 3: Unscrew the silver dome shape. Turn AntiClockwise to loosen.
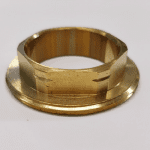
- Step 4: Use an appropriate sized spanner (or adjustable spanner) to loosen the Brass Nut. Turn AntiClockwise to loosen
Example of Brass Nut
- Step 5: Remove defective cartridge.
- Step 6: Before putting in new cartridge check the inside of the tap body and remove any debris that might be there.
- Step 7: Replace and tighten brass nut.
- Step 8: Replace silver dome.
- Step 9: Refit the lever handle.
- Step 10: Refit the grub screw.
- Step 11: Turn on the water.
I hope the information below will be of some help to you. If you are in any doubt about CHANGING a Kitchen Tap Cartridge – do contact a professional plumber.
You can purchase Tap Spare Parts here.

